Reference Guide For Android and iOS - Phones and Tablets
Product Info: http://iscoresports.com/baseball
Forum: http://iscoreforum.com
Training: http://iscoresports.com/baseball/training.php
Thank you to the following Forum Moderators for collaborating on this document mprusak - Mark Prusak OhioTex - Charles Vincent PetroGuy - Lee Utley team mom - Mindy McCloskey |
Date | Notes |
3/23/2013 | Initial release of Reference Guide. |
Scorecast Options on Scoring Screen
Player Cards from Scoring Screen
Scoring Examples - Trickier Plays
This document covers iScore Baseball for both Android and iOS devices. The vast majority of the functionality between the two platforms is the same. There are some cases where iScore follows the Android conventions for certain operations on Android devices. Examples of this would be on lists, pressing and holding a row will typically bring up a context menu for things like deleting items, and on several screens the built in Menu button will bring up options for that screen.
In many cases, the document will include a screenshot from each platform if they are different enough to warrant it.
Please note that Android has MANY different devices and the different versions of Android OS can vary the look of screenshots. The Android screenshots will be representative of a typical Android device, but your specific device may look different due to these differences.
In cases where functionality is mostly the same, but Android has something that works slightly different, we will include a note like this:
|
Tips will be included throughout the document that point out some things that may not be obvious and/or are commonly asked questions about the topic. They will be designated as follows:
|
A few miscellaneous tips from long time users.
#1 - Use Options -> Export after every game you score.... this not only uploads your game data to the free admin website, any team website subscriptions, but it also safely backups your data on the iScore servers in case you lose or change your device. Make it a habit! Normal post-game workflow should include performing an export.
#2 - Save your historical game/team/player data .. iScore stores your data on your device, so you have it with you whenever you like, (with or without internet connectivity ). Storage space for iScore games is nominal. One game is about 150KB of data. A typical song in iTunes is roughly 5MB, so you can store about 30 games in the same space it takes for a single song. It is recommended that you do not delete players, teams and game data as many users have found they go back and reference them sometimes years later. iScore offers a function called “Leagues” that allow you to filter your data and make it more manageable as your database grows. More information on Leagues can be found in this manual.
#3 - Update to Latest Version (for Free) on iOS and Android platforms. iScore runs on both iOS and Android devices and we highly encourage you to keep the software up to date from Android Marketplace and Apple App store. The update is free for any device as long as you use the id used for original purchase. The two programs are mostly the same but there are a few differences in user interface techniques (eg iOS shake to cancel, Android delete by context menu) and we have tried to highlight differences when they exist in this document.
#4 - Base application is complete and you can share scored games for free by email, excel or iscorecast. Optional Major League Rosters, Team Web Site, and Player Spotlights are great add ons and available for purchase, but all the core features and functionalities necessary to score games and maintain and share stats over time are included in the base app purchase and the free online Admin Web site. Again, Optional purchases are optional functionality, purchase of the app provides unlimited use and unlimited viewing and sharing.
#5 Youth - to- Pros .. Baseball and Softball - We’ve got you covered, iScore can handle youth leagues as well as Pros, For example, Little League 10 fielders, Rec Slowpitch starting with 1-1 counts, ASA Fastpitch EH, DH, DP/Flex, USSSA, Major League / NCAA / NHFS. iScore does not apply the rules, but provides the scoring tools to score various leagues from youth to pros. Score what you see and iScore will take care of the statistics for you.
#6 Team Rosters and Game Line Ups are different. Team Rosters are created in Team Manager and can contain active and inactive players. Game Line Ups are generated from the current state of a team roster at the time a game is created, but they become independent of the Team Roster thereafter. This has two consequences.
First, changes to the Roster will not affect the lineups of games you have already created. If you expect there to be changes in your roster that you will want reflected in future games, do not pre-create future games, or understand that the pre-created games’ lineups will have to be modified independent of the roster.
Second, changes to the Lineup are not automatically reflected in the Roster. For example, if you change a jersey number in the Lineup, the Roster for the team will not automatically reflect the change (a player could wear a different jersey number for that one game only and you would not want that one game to change your roster). You can, however, choose to copy your lineup changes back to your Roster by pressing the Options button in the lower right of the Lineup screen and selecting “Copy Lineup to Roster”. Similarly, sometimes you may create a lineup for a team on the fly at game time, without using an existing roster from Team Manager. In that case you would want to use “Copy Lineup to Roster” so that the next time you play that team, the roster already exists.
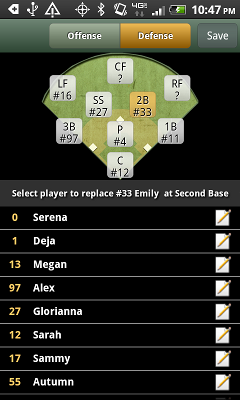
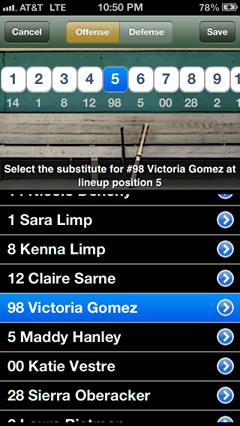
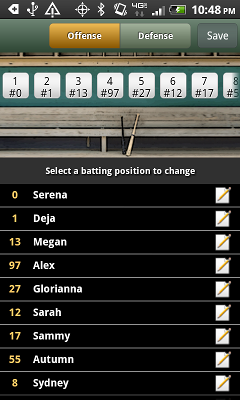
#7 Substitutions and Roster Batting - iScore lets you manage offensive and defensive substitutions independently, Simply tap the offensive and defensive icons (the batter image or the fielder buttons) on the main scoring screen and the substitution dialog will appear. The substitution dialog has a switch at the top to switch between offensive and defensive substitutions. If all of the players in your Starting Lineup are marked as Batting = Yes, you will only have defensive substitutions. To enable offensive substitutions you need at least one player available on the bench (not marked as Batting=Yes in the Starting Lineup). Do not use the Starting Lineup screen to try to make substitutions. The Starting Lineup screen should reflect the state of the lineups at the time the game starts. Use the Substitutions dialog to make substitutions.
#8 Score What you See and Practice Makes Perfect - But Rest Assured, Iscore has extensive edit capabilities. The mantra for iScore is “Score What You see” which makes scoring a live game fairly intuitive, but there is still a learning curve to utilize all the features and functionality. New users are encouraged to score a practice game or two in front of the TV before heading to the diamond on their own. Once there, ensure you get the right number of batters in each team line up and rest assured iscore has many capabilities to edit mistakes after the fact. Score what you see and be confident, most mistakes can be corrected after the fact.
#9 Prepare as much as possible before getting to the ballpark. Many times you can use the Discover Team functionality to have the team Rosters already loaded onto your device. This will make getting ready for the actual game much easier at the field.
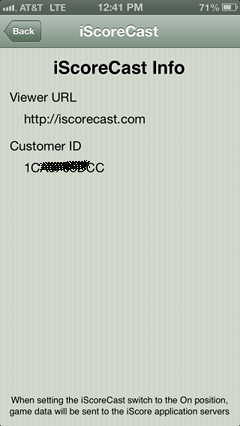
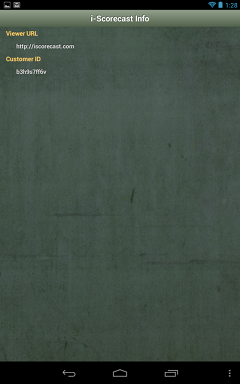
#10 Internet connection is NOT required to score a game. You can score a game without an internet connection, and then email results when you get back home and have a WiFi connection. The only reason you may need an internet connection at the field is if people are going to follow the game via iScorecast or Twittercast, but iScore is fully functional even if you don’t use these options.
#11 Swinging vs Looking Strikes (and other “hidden” functionality). OK, this is #11 on a top 10 list, but it’s worth mentioning. You can enter swinging strikes by placing your finger on the strike button and sliding it up without lifting. This “swipe” can be used in a few other places as well. If you swipe the Ball button, it’s an intentional ball. Swipe the Out button for a menu of “quick outs” to quickly score various common outs (including double plays when runners are on base). Swipe a base runner to quickly enter pick off attempts and stolen bases.
For those wanting to Jump right in, we suggest doing a practice game from the comfort of your living room with a recorded baseball game. If you do not have a recorded game, you can practice various scenarios that you know will come up in a live game. Base hits, ground outs to shortstop, double plays, stolen bases, substitutions, lineup changes, etc. If you have done it once at home, it is much easier at the field.
The fastest way to get started is to follow along with the training videos available at http://iscoresports.com/baseball/training.php.
The iScore Forum is also a great reference where most questions have been answered at some point either by iScore staff, or other iScore users. You can find the forum at http://iscoreforum.com.
You can also jump straight to the Scoring Screen section for details on actual game scoring.
The Home Screen is the main entry point for iScore and is what appears when you first start iScore. It looks essentially the same on all platforms:
Each of the buttons on the Home Screen will be covered in more detail in the following sections, but here is a brief overview of what each button is used for.
Team Manager - Manage the teams you will use to keep score. You will want to create your own team(s) as well as the opponents you will be facing. You can create teams from scratch, or use one of the many “Discover” options to find team rosters from various sources on the internet. You will also go to Team Manager to select a team that you want to view cumulative stats for.
Game Manager - Everything you would want to do with a Game is done from Game Manager - Create new games, manage existing games, score games, view stats for a game, and email game reports. Some of our partners include “Discover” options for Games as well.
Player Manager - Here you can manage the players you will be scoring for. Many times you will create players as part of a Roster for a Team you create in Team Manager. The list of players in Player Manager are the actual “people”. The players are not associated with a team when viewed in Player Manager. A player may be on multiple teams, but should only appear in Player Manager one time. You can view a Player Card in Player Manager to see a player’s lifetime stats across all teams they have played for. You can also Merge players if you have accidentally created multiple records that represent the same person.
League Manager - Leagues in iScore can really be thought of as “groups”. Leagues can be used to group Teams, Games, and/or Players into a set that can be viewed separately from the rest. Some of the most common uses for Leagues are to designate “Seasons” or to separate “Tournaments” into a group of games for viewing cumulative stats for just a particular season or tournament.
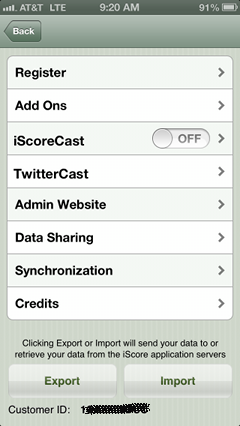
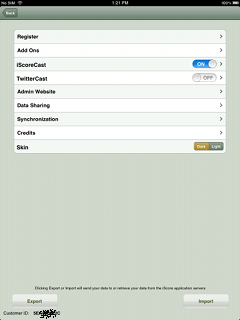
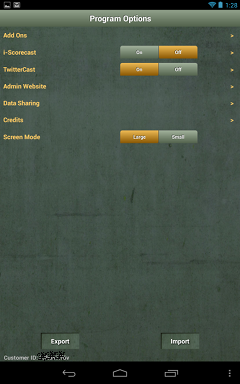
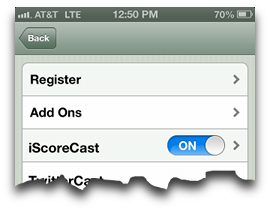
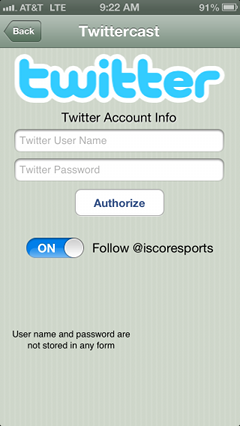
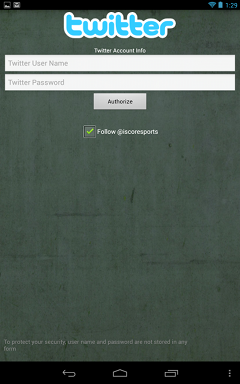
Options - This is where you go to set up application-wide settings and do miscellaneous maintenance activities. You can view Add Ons from here (MLB Rosters, Team Websites, TruMedia, etc), enable broadcasting with iScorecast or Twittercast, Data Share with others, and possibly most importantly, Export your data to our servers (for backup and viewing with various online apps).
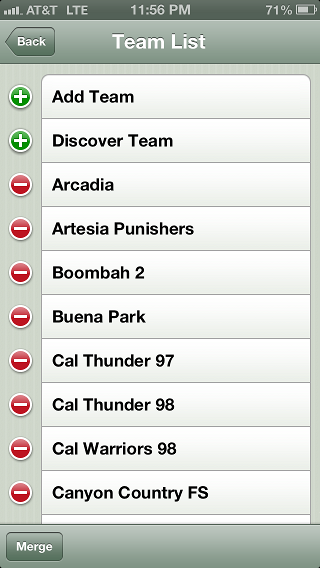
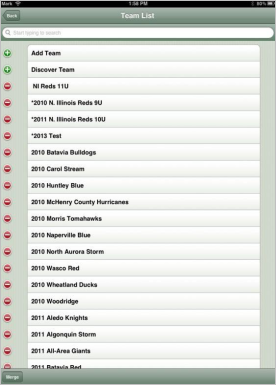
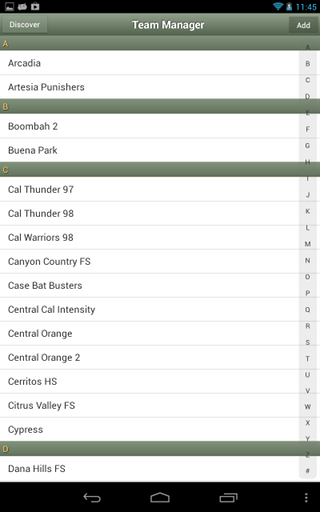
Team Manager allows you to manage all aspects of your teams. When you select Team Manager, you are presented with a list of all the teams on your device. If you use Leagues to help manage your data, the list will only include teams in the currently active League(s).
Here is what the Team List looks like on the different devices:
iPhone | iPad | Android |
|
|
|
All of the devices have the same basic functionality as follows:
Back - You can go Back to the Home Screen by tapping the Back button. On Android, you use the built in Back option.
Add Team - You can create a new team by tapping the Add or Add Team option from this screen. This will create a new team on your device.
Discover Team - You can “discover” teams from internet sources by tapping the Discover or Discover Team option. You will be given a list of possible sources of team data. In some cases (NCAA Rosters, MiLB - Minor League rosters, and possibly more in the future), it would require an add on (MLB Roster Add on in the above cases) to see the choice. In some cases it may also require a login to the source system to access the discover options. See the Discover Team section for more information on team discovery.
Delete Team - If you are never going to use a team again (you created a practice team for example), you can delete the team from the list. On iOS devices, you would tap the red minus sign to the left of the team, and a Delete confirmation button will appear before you delete. On Android, you would place your finger on the team you want to delete and wait for the context menu to appear, then tap Delete.
|
|
Merge - If you accidentally created a second team that identifies a team that is already on your device, you can combine those teams (and associated stats / players) back into a single team so you can get the proper cumulative stats and reports.
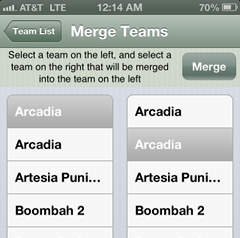
To merge teams, follow these steps:
|
|
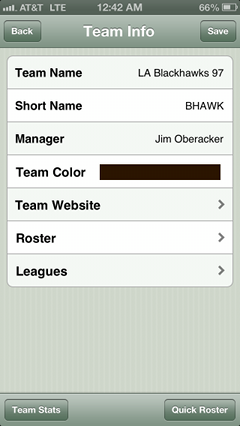
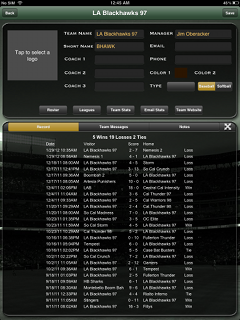
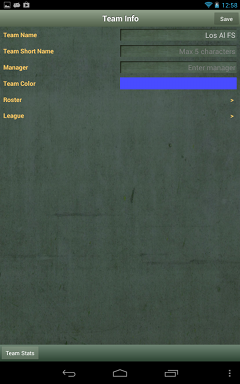
When you create a new team or tap on an existing team, it will bring up the Team Info screen for that team. The Team Info screen allows you to edit the details of the team, edit the roster, view cumulative team stats, assign leagues, and depending on the device, there may be a few additional options as well.
iPhone | iPad | Android |
|
|
|
Here are the basic settings available on all devices:
Team Name - This is the full name of the team
Short Name - The short name of the team is used when space is limited and should be a short abbreviation for the team. The main place you will see it used is iScorecasts
Manager - Manager or head coach of a team.
Coach Names - Some devices will allow you to enter assistant coaches
Team Color - This is the primary color for the team. It is used in various places to help identify the team (iScorecasts, box scores, pitch by pitch listings, etc)
Secondary Color - Some devices allow choosing a secondary color that represents the team. This is really just informational.
Team Website - Some devices allow purchasing an Optional Team Website right from the Team Info screen. A Team Website gives your team a presence on the web and allows others to view details of your team (including stats) in a centralized location. Stats on team websites are automatically updated for the games you score. The iScore Team Website pages / data can also be embedded into third party team websites to enhance / automate updating of those sites. If you are considering a website for your team, the iScore Team Website may be a good choice for you.
Roster - You can edit all the players on a team be selecting this option.
Leagues - You can assign the League(s) the team should be grouped under by tapping this option.
Team Stats - You can view cumulative team stats for the selected team by tapping this button. The stats will be filtered to only include games in the currently activated leagues (in League Manager), so you can view cumulative stats for subsets of games any way you like. See more about Team Stats in the Team Stats section.
Quick Roster - If you are creating a team that you don’t know the players for yet, you can use the Quick Roster option to quickly create a set of players that can later be renamed while scoring a game to match the actual names. This is a great way to get started with a team you are facing for the first time and either don’t have time to enter their roster prior to game time, or you are not given a roster pre-game.
Record - Some devices will display a listing of all games with final scores and the Team Record on the Team Info screen.
|
Team Messages - Some devices have a team messages option which will allow Team Website owners to send messages to their players (future enhancement).
Team Logo - Some devices allow uploading a team logo right from the team info screen. Tap the team logo box to select an image from your device and upload it to the iScore servers. The logo can be seen on iScorecasts as the image for any player that does not have a photo. NOTE: You can also upload Team Logos through the Admin Website for any device. Photos uploaded on the Admin Website will be seen on the iScorecasts as well.
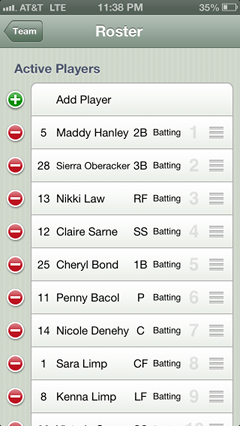
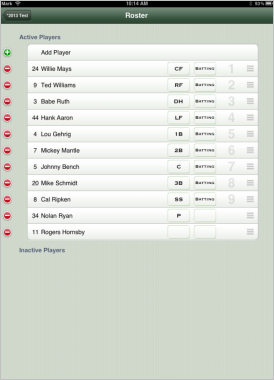
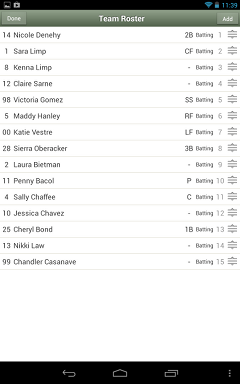
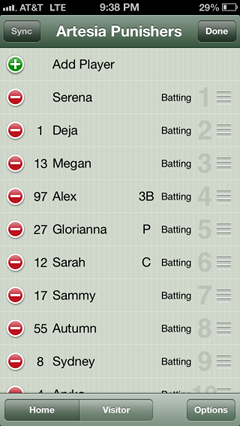
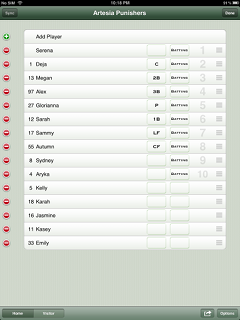
Each team has a roster. The roster for the team is the list of all players on the team along with their default batting lineup order and fielding positions. The roster will be the default Lineup any time a new game is created. Be sure to check out the Discover Team functionality to find team rosters online from many sources - this will save you the time of typing in the rosters. If you don’t know the roster of an opposing team prior to game time, and you know you will not get a lineup in time to type the roster in before game start, you can create a “quick roster” which will create a set of placeholder players that will let you score the game and update the names/jersey numbers as the game progresses.
iPhone | iPad | Android |
|
|
|
|
The functionality that can be performed from this screen is as follows:
Add Player - By tapping the Add Player option (or Add button), you can add a Player to the team roster. You will have the option to select from all existing players on the device, or you can create a new player. One of the nice features here is that from season to season and year to year, you will see a lot of the same players again and again, so over time, you will have a nice history of all the players you have scored for.
|
Remove Player - Tap the red minus sign to the left of a player on iOS devices to remove a player from a roster. Place your finger on a player and hold it until the context menu appears, then select the “Remove from Roster” option to remove a player from the roster.
|
Reorder Players - The order that the players appear in the roster will be the default batting order when a new game is created. You can reorder the list by placing your finger on the “3 bar” icon on the far right, and it will “lift” the row, and you can then drag the player up/down the list.
Active vs Inactive - On iOS devices, you can drag players between the Active and Inactive roster sections. When a player is Inactive, it means they will not be added to the Lineup of newly created games.
|
Setting Jersey #, Position and Batting Status - On iOS devices, you can set the Jersey # directly from the list by tapping a row just to the left of the Player Name and entering the # for that player. You can also set the default position of a player right from the list by tapping the row where the positions are displayed and a selector will appear to allow you to select the position. You can also set the the default batting status for a player by tapping the row where the Batting Status is shown and a popup will appear allowing you to select the status (Yes, No, DP, Flex). On both iOS and Android, these values can also be set by tapping the player name to bring up the Player Info screen for that player where you can set all details about a player. (See the Player Info section for more information about the meaning of the Batting Status fields.)
|
Edit Player - By tapping on a player, you will bring up the roster Player Info screen where you can edit the details of a player. This is the topic of the next section.
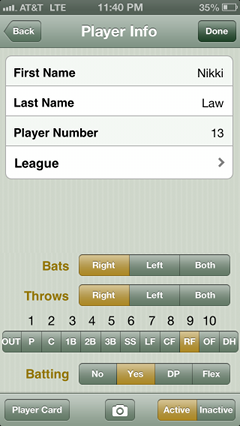
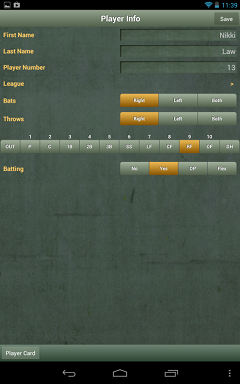
Going into the Player Info screen from a team roster shows details of the player as well as information that is specific to the player on the team. For example, the player first and last name are actually details of the underlying player. If you edit them on this screen, it will affect all instances of this player. The Player Number is specific to the player only on the team the roster is for (a player may have a different number on every team they play on).
iPhone | iPad | Android |
|
|
|
There are many things that can be edited from the Player Info screen as follows.
First Name - First name of the player. Changing this will update the player throughout iScore.
Last Name - Last name of the player. Changing this will update the player throughout iScore.
Player Number - This is the Jersey # of this player, and is specific to the selected team.
League(s) - By selecting this option, you can add this player to any number of leagues. See the section on Leagues for more information on how this is useful.
Bats - Does this player bat Right handed, Left Handed, or Both (switch hitter)?
Throws - Does this player throw with their Right hand, Left hand, or Both (either - yes, there are players that can use either hand... even at very high levels there have been some ambidextrous pitchers).
Fielding Position - Select the default fielding position for this player. “OUT” means they will not start in a fielding position. “OF” actually stands for “Other Fielder” (not Outfielder), and is the 10th fielding position when you have a game set to use 10 fielders. DH is designated hitter.
Batting - Set whether the player bats by default or set if they are in the DP/Flex spot. Setting this to No means the player is not in the starting batting lineup. Setting this to Yes means the player is in the starting batting lineup. Setting this to DP means the player is the Designated Player and setting this to Flex means the player is in the Flex spot.
|
|
Active / Inactive - On iOS devices, just like from the Team Roster list, you can set players to Active or Inactive. See that section for information on what Active / Inactive does.
Player Photo - On iOS devices, you can also upload Player Photos right from the Player Info screen. Tap the Camera icon, and on devices with a camera, you can take a picture of the player. On devices without a camera, you can select from your photo album. The Player Photo will be displayed on the back side of Player Cards, they will be displayed on iScorecasts, and they can be displayed on the optional Team Websites on the Roster page there. On Android devices (or for iOS users that would rather use a website to select photos), you can upload photos directly to the Admin Website by following the instructions at this link:
http://iscoresports.com/baseball/kb/faq_general/add_player_photos.php
Player Card - You can view more information about a player by viewing their player card by tapping the Player Card button on this screen. See the next section for more information on Player Cards.
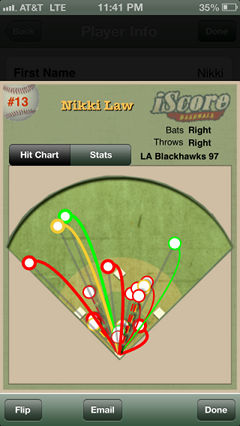
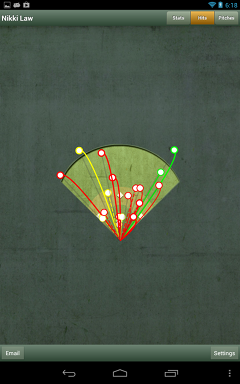
A player card gives you more details about a player including the ability to view their game by game statistics and hit charts. The data displayed will be filtered by the league(s) you currently have selected in League manager.
iPhone | iPad | Android |
|
|
|
The option available from a Player Card are as follows:
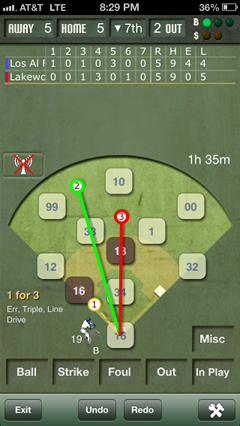
Hit Chart - View the hit chart for the player. This will show the last 50 balls put in play for a batter. Red Line = Out, Yellow Line = Reached Base but not a Hit (Error, Fielders Choice, etc), and Green Line is a hit. Dashed line is a grounder, Solid line is a line drive, Curved line is Popup or Fly Ball. The thickness of the line indicates the strength you selected for the hit.
Stats - This will show the statistics for this player for each individual game they played in for the currently selected League(s).
Pitches - On Android devices, you can tap the Pitches tab to see a speckle chart of this player’s recent pitching.
Flip - The “flip side” of a player card (iOS only) will be the photo for the player. If you have the MLB Add On, the Flip Side will be a link to espn.com for the MLB player if you are viewing a Major League player. It will be a link to milb.com for a MiLB player if you have the MLB Add On. (These options all require internet connectivity.)
Email - You can email the Player Card from this screen. The emailed player card is a nice PDF summary of this player’s performance and includes a hit chart, the stats for the player, and even the player’s photo if one has been uploaded.
Analytics - If you are using an iPad, and have an optional Analytics Add On, you can also view the detailed analytics from this screen.
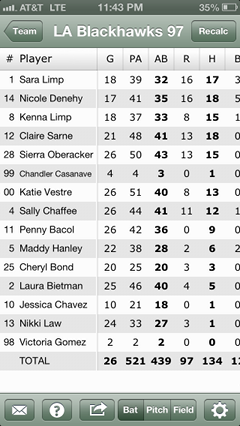
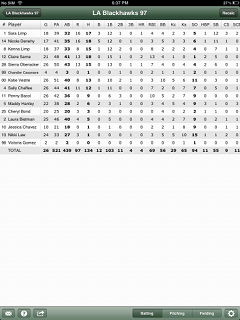
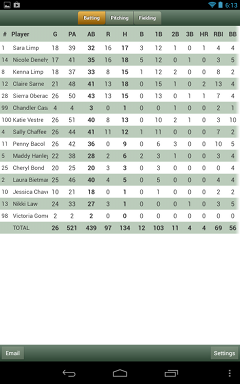
You can view cumulative team stats by going to Team Manager, selecting a team, then selecting the Team Stats button. The stats displayed will be based on all Games for the selected team that are in the currently active leagues. See the League Manager section for more information on filtering data by leagues.
|
iPhone | iPad | Android |
|
|
|
The Team Stats screen allows you to do the following:
Sorting - You can sort by any column by tapping the header for the column. Tapping again will reverse the direction of the sort.
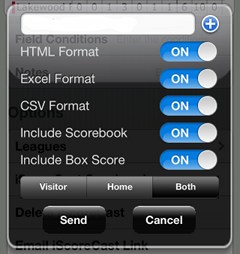
Email - You can email the Team Stats by tapping the Email button and entering an email address to email to. The stats can be emailed as HTML, Excel, and/or CSV formats. When you select email, you will have the option to select the format you want to email in.
|
|
Stat Groups - You can select between Batting, Pitching, and Fielding stats on this screen by tapping on the appropriate selector.
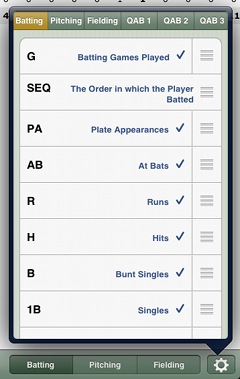
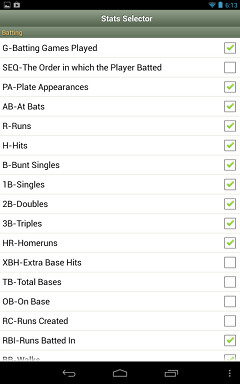
Rearranging / Picking Stats - You can rearrange the order of columns and decide which stats you want to view (iScore has over 350 stats available!) by tapping the Setting button in the bottom right corner. This will bring up a screen that allows you to hide / show stats (by tapping the rows), or rearrange the stats (by dragging the 3-bar icon up/down the list). Some devices also allow you to set your criteria for Quality at Bats (QAB1, QAB2, and QAB3) from this screen as well.
iPhone | iPad | Android |
|
|
|
With over 350 stats available, and new stats being added, it is better to have a link to the available stats instead of trying to list them all here. See the following web page for a detailed list of available stats:
http://iscoresports.com/data/legend.php?s=baseball2
Recalc - You can use the Recalc button to recalculate the statistics. The vast majority of the time, doing a recalc is not necessary. It is only needed if iScore adds a new stats that requires event analysis in order to recalculate the statistics for past games. (v4.0 is an example where iScore added many new stats that required a recalc, but it is not a common occurrence.) When recalculating, you will be given the option to keep your overrides but recalculate the rest of the stats, or to recalculate all stats. If you have manual overrides to stats that you don’t want ot lose, be sure to select the appropriate option.
|
Air Print - On iOS devices, if you have an “Air Print” compatible printer, you can print the stats right from this screen as well.
The Discover Team functionality allows you to pull in a Team and Roster from an external source. To discover a team, go to Team Manager and select the Discover Team option. You will then be given a list of Organizations to choose from:
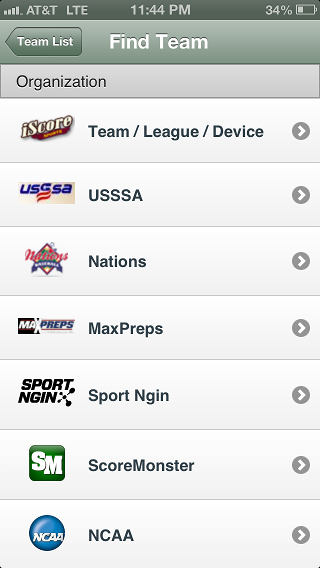
The organizations available to you will vary depending on the Add Ons you have and other factors. If you do not see your organization listed, you may want to contact that organization about whether they have plans to support iScore integration. Let them know they can reach us at support@iscoresports.com if they would like to integrate.
Once you tap an Organization, you will be given options for searching for a team based on the details required by the Organization. Some will require logins and some are public. Step through the search screens, and when you find the team and confirm the import of the roster, the team will be available in Team Manager just like any other team.
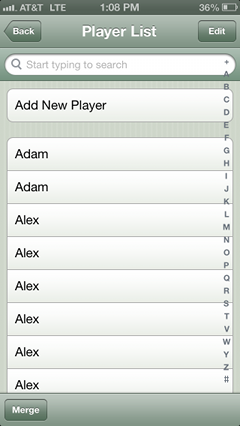
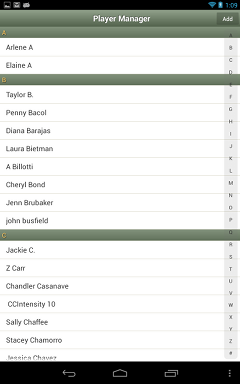
Player manager is where you can go to manage the players you have scored games for. A player in player manager is the underlying “person” that can be a member of one any number of teams. When viewed through Player Manager, you are viewing the person, and edits made will apply to all teams the person might be on. When viewing stats, it would cross all teams the player has been on (filtered by the currently selected League(s)).
iOS | Android |
|
|
Quick Navigation - The player names are grouped by last name (or first name if no last names are given). There is a “letter index” down the right side of the list that allows you to tap any letter and quickly jump to the group of players that start with that letter. On iOS devices, there is also the filter where you can start typing a name and it will narrow down the list of players based on the letters you type.
Add New Player - You can press the Add New Player option (or Add button on Android) to add a new player. Many times you would just add new players when creating a Roster for a team, and they will wind up in this list as well. But if you want to Add Players, then add them to teams later, you can do it from here.
Delete Player - On iOS devices, tap the Edit button in the upper right corner, then tap the minus that appears to the left of a Player to delete the player. On Android, press and hold the player and a context menu will appear allowing you to delete the player.
|
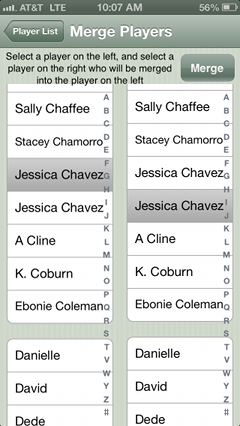
Merge - If you have accidentally created multiple versions of the same player, you can use the merge option to combine them back into a single player so the cumulative stats will be correct. To do this, tap on the merge option, then select the first player to be Merged in the left list, and the second version of the player in the right list, then tap the Merge button in the upper right corner to combine the players into one.
iOS | Android |
|
|
|
Edit - You can edit a player by tapping on the player in the Player List. See the Player Info section for details on what can be edited.
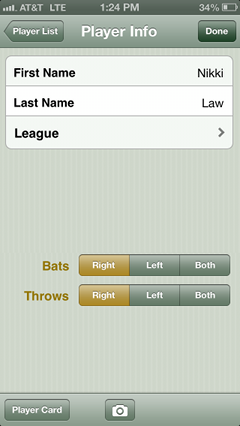
The Player Info screen is where you can view and edit details about a Player. Edits on this screen will apply to the player throughout iScore, including any team rosters the player may be on. You can also view the Player Card and stats for the player from here. You will notice this Player Info screen is similar, but not identical to the Player Info from the Roster screen. This one does not include things that would be specific to a team.
iPhone | iPad | Android |
|
|
|
For iPhone and Android, this screen works the same as the Player Info screen in the Roster section, it just does not have the team specific fields. See the Roster Player Info section for more details.
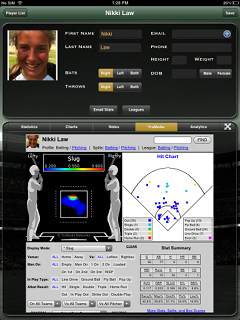
On iPads, there are a few additional options from this screen. The “Player Card” has been combined into the Player Info view, and there is a little extra functionality as well. The following describes the iPad specific features.
Player Photo - You can see the current Player Photo from this screen. Tap the Player Photo are to change the photo at any time. It will be uploaded to the internet for use by iScorecasts, Team Websites, and emailed player cards, so be sure you are connected to the internet when using this option.
Email, Phone, Height, Weight, DOB, Gender - You can enter personal player information for the players. The email will be used by default when emailing the player card for this player if it is set. The other fields are informational only for now.
The bottom section shows a few additional bits of information.
Statistics - You can view all the player statistics right from this screen. This will be statistics for any teams the player has played on for any games in the currently selected league(s).
Charts - This will shows the Hitting Chart for the player. (On other devices, this information is seen on the Player Card).
Notes - Any notes you want to keep for the specific players. These notes are displayed on the Team Roster if you have an Optional Team Website.
Add On Views - There are some third party add ons that can display additional information in this view as well. The screenshot above includes the view of data from TruMedia Analytics which allows you to see very detailed analytics on the pitching and batting for a player. This includes situational statistics, splits, heat maps, etc.
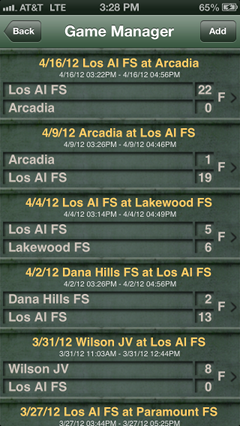
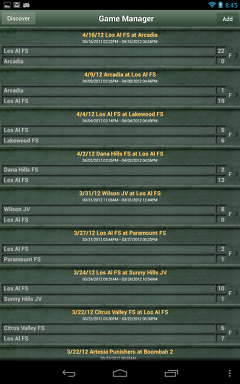
Game Manager is where you will go to view your previously scored games and create new games to score.
iOS | Android |
|
|
The following options are available from the Game Listing.
Discover - On Android devices, the Discover option is available from this list to discover new games. See the Discover Games section for more information on using this option.
View Existing Game - You can tap an Existing game to view the details of the game (stats, line score, notes, scorecard, etc), email the game results, make post game edits to a game (editing the Pitch by Pitch or overriding stats), or even scoring a game. See the Game Info section for details on editing a game.
Add - Add creates a new game. To score a game, first you will add the game, then you will select it from the Game List. See the New Game section for the details of adding a game.
The Discover Game functionality allows you to import a game from a third party so that you can score the game from iScore. Using the Discover Game option will import the game details (competing teams, date/time of game, any additional information available about the game) as well as the complete rosters for both the Home and Visitor Teams. This is a great way to make it easy on scorekeepers for leagues and organizations that try and track data in a central location. Some of the third parties will provide full integration with iScore allowing the games that you have scored to be imported back into the third party site. Often you will also be able to view iScorecasts from a link on the third party sites as well.
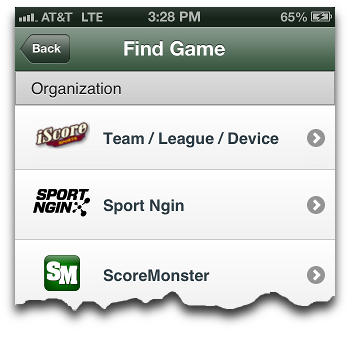
To Discover a game, first tap the organization you want to discover from by tapping on it. Each organization will have a different set of steps involved to discover games depending on how the data is organized. Some organizations will only appear if you have signed up for their service. Some will require you to log in to discover games. In any case, it is as simple as following the on screen instructions to find a game, and then using the Import button on the last step.
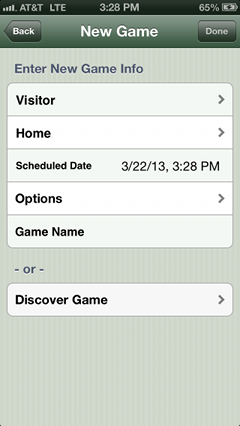
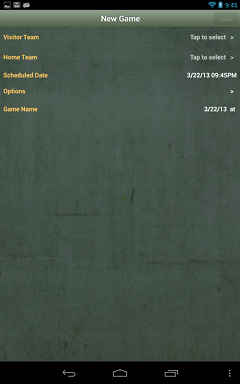
In order to score a game, you will first need to provide the details of the game.
iOS | Android |
|
|
Visitor - Select the visitor team by tapping the visitor row and selecting a team from the list of available teams. You will also have the option of adding a new team from the team list if needed.
Home - Select the home team by tapping the visitor row and selecting a team from the list, or creating a new team.
|
Scheduled Date - Enter the date/time the game is scheduled to begin.
Options - You can set various scoring options for the game (# of innings, # of fielders, baseball vs softball, etc). See the Game Settings section for more details on the options available.
Game Name - By default, the game name will be set based on your visitor and home teams and the scheduled date of the game. You can override this value if you want to give the game a name instead of using the default (e.g. “Championship Game”, “Playoff Game 1”, etc).
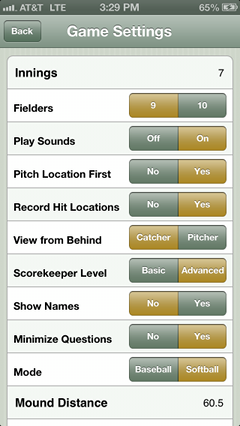
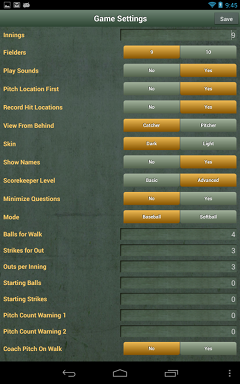
Game Settings allow you to change the way iScore works to fit your particular game situation. iScore includes settings to change details of the game (innings, fielders, etc) as well as some settings for a scorekeeper’s personal preferences (sounds on / off, view for the pitch location screen, etc).
iOS | Android |
|
|
The settings available are as follows. (NOTE: Some devices may not have all options depending on device type / device size.)
|
Innings - This is the number of scheduled innings for the game. For High School games, this would generally be 7 innings. For Major League Baseball, it is 9. For some youth games it is 6. Setting this value will let iScore know when the game will end under normal circumstances (Home team ahead when it is their turn to bat in this inning, or upon completion of this inning and the score is not a tie). You should not change this based on ties or based on games shortened for time. A time game will automatically go into extra innings. If a game should be ended early due to time constraints, mercy rule, darkness, or any other reason, you would use Misc -> End Game while scoring to end it. The Scheduled Innings would not be changed in those cases. The Scheduled Innings are used when calculating ERA for pitchers. iScore will always include the ERA9 stat (ERA based on a 9 inning game), but it will also include just ERA which is the earned run average based on the number of scheduled innings for the games pitched.
Fielders - You can choose whether your game has 9 or 10 fielders. If you choose 10 fielders, the 10th fielder will be shown in the outfield on the scoring screen, but you can treat that player as an extra infielder, or whatever configuration your team uses. To designate the 10th fielder, set a player’s defensive position to “OF” (other fielder).
Play Sounds - Should iScore play sounds when the Ball / Strike / Foul buttons are used? This will give audible feedback when tapping these options on main scoring screen.
Pitch Location First - Should pitch location be entered prior to the batter’s action? Some people prefer to enter the pitch location prior to selecting the outcome of the pitch, and others prefer to enter the outcome of the pitch, then the pitch location. This lets you decide which is best for you.
Record Hit Location - By default, you are prompted to enter the location of all hit balls. This option allows you to turn off recording of hit locations if you do not want to track where the ball is hit. (This is a common option for folks using iScore with board games like Strat-o-Matic --- there is quite a following of iScore users using it to score these board games.)
View from Behind - For people that are entering pitch locations, depending on where you are sitting, it may be easier to enter the pitch locations based on the view from behind the pitcher, or the view from behind the catcher. This effects the left to right placement of the ball.
Scorekeeper Level - Setting this to Advanced allows you to score some situations that many scorekeepers do not care to capture. Turning on advanced will give a few more options when scoring plays. For example, when scoring an Error, you can select whether it is a Fielding or Throwing error. It also allows you to score situations where a fielder should get an assist even when a putout is not made (e.g. SS throws to 1B, but 1B drops the ball. SS gets an assist in this scenario.) Also, on running plays it will ask you if the error should have resulted in an out. This will help more accurately determine ERA. If you are scoring for youth games or are new to scorekeeping, leaving this in Basic mode will keep things as simple as possible.
Show Names - This tells whether to show player names on the field (as opposed to just jersey numbers). On some small phone devices (320x480 resolution), including the names may make things look a little crowded, so you have the option to turn the names on / off.
Minimize Questions - In order to capture a complete and accurate accounting of a game, iScore asks questions designed to ensure every action is recorded. This includes asking questions such as what happens to the batter after he becomes a runner. In most cases the response would be Held Up, but in some cases the batter may advance additional bases after reaching the initial base. Take, for example, a runner on second and the batter hits a single. As the runner on second tries for home, the batter goes for second "On the throw". The play would therefore be scored as a single, and when asked what happened to the batter after reaching first you would enter Safe, at Second, On the Throw.
If you prefer to be prompted for this information, set Minimize Questions to No. If you prefer to not have to enter "Held Up" for most cases and instead wish to remember to enter the additional actions when they occur, set Minimize Questions to Yes.
Mode - You can select Baseball vs Softball Mode. This has the effect of changing the pitch types available and changing the look of the iScorecast.
Mound Distance - By setting the mound distance, you can have iScore approximate the speed of a pitcher’s pitches. (The scoring section will cover how this is done.) The value should be entered in feet and/or fractions of feet (40.5 would be 40 ½ feet).
Balls for Walk - iScore allows you to set the number of Balls before a batter is walked. For most games, 4 is going to be the value to use. Occasionally local rules may reduce this to speed up play or increase it at very young ages for whatever reason. Whatever you set this to is the number of balls that will lead to a walk.
Strikes for Out - iScore allows you to set the number of Strikes before a batter is walked. For most games, 3 is going to be the value to use. As with Balls for Walk, sometimes local rules will change this to speed up play or make things easier on youths.
Outs per Inning - You can change the number of outs that make up each half of an inning. Standard baseball rules would have this at 3, but sometimes local rules may make this 2 to speed up play or more outs for “showcase events”. Sometimes at the youngest levels, the rule may be that the whole lineup bats before the other team comes up. In that case you could set the # of outs per inning to a number higher than the number of batters in a lineup, then just use Misc -> End Inning when the other team should bat.
Starting Balls - Usually a batter will start with a 0-0 count. Some leagues (like slow pitch softball) may start with a 1-1 count, so iScore allows you to change the starting # of balls for a new batter.
Starting Strikes - Usually a batter will start with a 0-0 count. Some leagues (like slow pitch softball) may start with a 1-1 count, so iScore allows you to change the starting # of strikes for a new batter.
Pitch Count Warning 1 - Some leagues have various limits on pitchers, so a pitch count warning may be set so that you are warned when a pitcher reaches this number of pitches thrown. Set this value to 0 if you do not wish to receive the Pitch Count Warning 1.
Pitch Count Warning 2 - iScore has a second pitch count warning level as well so you may use the Warning 1 to be reminded when a pitcher is close to a level, and maybe warning 2 is the final pitch a pitcher can throw. Set this value to 0 if you do not wish to receive the Pitch Count Warning 2.
Coach Pitch on Walk - At very young ages, rather than a batter getting a walk when 4 balls are thrown, the Coach will come in to pitch instead. This allows you to handle that scenario so that a batter will not automatically be sent to first base when a pitcher throws the 4th ball. Instead, a “coach” is subbed in for the remainder of the at bat.
Skin - Tablet devices will give you an option to choose between a Dark or Light skin. The Light skin option can help in sunny conditions by providing a higher contrast scoring screen.
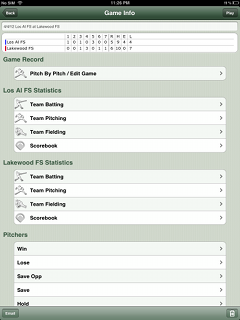
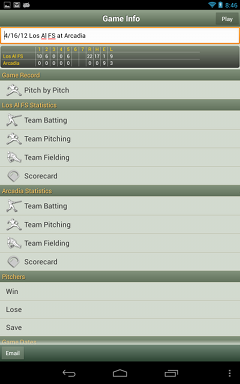
The game info screen allows you to set information about a game, view statistics for the game after scoring is complete, go to Pitch by Pitch where you can make post game edits, and even email links to the iScorecast for the game.
iOS | Android |
|
|
Here are the options that are available from the Game Info screen.
Play - The Play button is used when you are ready to begin scoring a game. Tapping this button will take you to the scoring screen. See the Scoring Screen section for more information on scoring.
Game Name - You can edit the name of the game by tapping in the edit area above the line score. You may want to rename significant games to something more meaningful than just the name of the teams and date of the game for example.
Line Score - You will see the line score for the completed game. This shows runs scored by inning, and totals for the game for Runs ( R ), Hits ( H ), Errors ( E ), and runners Left on Base ( L ).
Pitch by Pitch / Edit Game - This options will display the complete pitch by pitch listing for a game. You can also make post game edits to correct scoring mistakes, missed substitutions, etc. See the Pitch by Pitch Editing section for more information.
Team Batting - Tap this option to view batting stats for a team.
Team Pitching - Tap this option to view pitching stats for a team.
Team Fielding - Tap this option to view the fielding stats for a team.
Overriding Stats - If you made a mistake while scoring and do not (or can not) go back and edit the pitch by pitch directly, you can override stats by viewing the appropriate stats section, then tapping on a value and typing in the new value for that stat. Calculated stats can not be edited directly - you would have to edit the values that make up the calculated value. (You can identify calculated stats because they are in a bold font.)
|
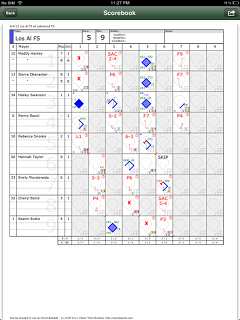
Scorebook - Tap this option to view a traditional baseball scorebook for a team (as seen below)
Pitchers - This section allows you to assign results to pitchers that played in the game. The rules for various pitching results vary greatly from league to league based on game lengths, age of players, local rules, etc so it is not possible for iScore to automatically assign these values. That is why iScore lets you assign them here when the game is complete.
Win - Tap this field to select the winning pitcher from a list of the players that pitched for the winning team.
Lose - Tap this field to select the losing pitcher from a list of the players that pitched for the losing team.
Save Opp - Tap this field to assign a save opportunity to a pitcher.
Save - Tap this field to select the pitcher that should be given a save (if any) from a list of players that pitched for the winning team.
Hold - Tap this field to select the pitcher that should be given a hold (if any) from a list of players that pitched for the winning team.
Scheduled Date - Tap this field to change the scheduled date/time for a game.
Started - When you being scoring a game, the Started time will automatically be set to the time of the device doing the scoring. You can edit the start time here if needed. An example of when you might want to do this would be if you are scoring the game after the fact from a hand scored game and you want to get the right start time for the game into the system.
|
Ended - When the game completes, the Ended time will automatically be set. Just as with the Started time, you can override it if you would like.
Visitor Team / Home Team - This will be set to the name of the visiting and home team as it is set in Team Manager. It is kept on a per game basis however because sometimes team names will change over time. You may change the name of your team in Team Manager, but that would not change the fact that they were called something else when a particular game was played.
Location - You can enter where the game took place.
Weather - You can enter the weather at game time.
Field Conditions - You can enter the condition of the fields at game time.
Notes - You can enter any extra notes you would like about the game (umpire names, attendance, etc)
Leagues - You can assign the League(s) this game should be associated with. This is a very powerful feature that allows you to group games for cumulative stat reporting. See the League Manager section for more details on how leagues can be used effectively.
iScorecast Synchronize - Tapping this option will send a complete copy of all events for the game up to the iScorecast server. This requires internet access. It can be used to send games to the iScorecast server in situations where internet was not available at the field while scoring the game live, the internet connection was spotty so not everything made it to the iScorecast server, or if you scored a game with iScorecast turned off and later decide you would like the game to be available on the iScorecast Server. See the iScorecasts section for more information on iScorecasting your games.
Delete iScorecast - Tapping this option will remove the iScorecast for this game from the iScorecast server.
Email iScorecast Link - Tapping this will allow you to email links to people you want to view the iScorecast for this game.
Email - The email option in the bottom toolbar can be used to send detailed reports of the game. You will have the option to email in several different formats.
Delete Game - On iOS devices, tap the trash can icon in the bottom right corner to delete a game. On Android, you delete games from the Game Manager list of games by holding your finger on the game you want to delete until the context menu appears with the Delete option.
|
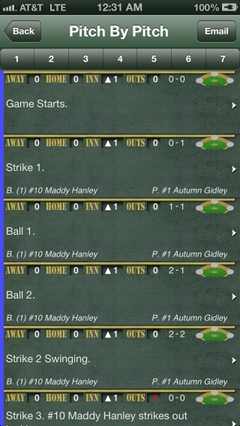
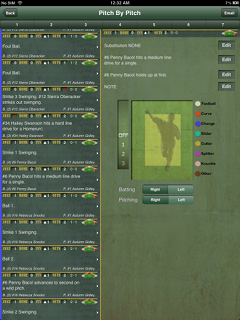
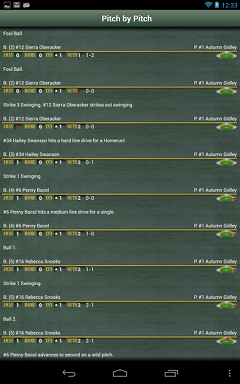
Going to the Pitch by Pitch screen allows you to see the complete details of the game listed a pitch at a time. You can go here just to review the game, or to make edits and fix mistakes.
iPhone | iPad | Android |
|
|
|
From the Pitch by Pitch screen, you will see each event for the entire game in a list. You can tap any of the pitch rows to see the full details of the pitch and even make edits. On an iPad, the Pitch Editor is listed right next to the Pitch by Pitch listings. On other devices, tapping the row will bring up the Pitch Edit detail screen:
Starting Lineup Editing - If you need to adjust the starting lineup for the game (you had players in the wrong order for example), you can tap the Game Starts event, then tap the Edit button next to Starting Lineup. This will bring up a Home and Visitor selector where you can edit the starting lineup.
|
Editing Substitutions - If you missed a substitution or entered one incorrectly, you can tap the pitch just before the substitution should have been made, then tap the Edit button next to Substitution, and you can enter any offensive or defensive substitutions.
Editing a Play - If you made a mistake while scoring a play (entered a base hit when it should have been an error or vice versa), you can tap the pitch where the mistake occurred, then tap Edit next to the text that describes the event you need to fix. It will then show the alternative scoring options based on the play result. For example, if the result of the play was a runner reaching first base, you would have the option of changing it to a reach on error, a hit, a bunt single, a walk, etc. Anything that results in the same outcome would be valid. You can not change the outcome (i.e. you can not change an OUT to SAFE or a player that was SAFE to an OUT) because that could have cascading effects on the game and leave things in an inconsistent state. For example, if iScore allowed changing a player from Safe to Out, you would then have 4 outs in an inning that only allows 3.
|
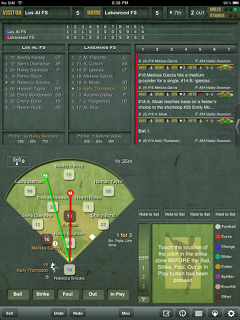
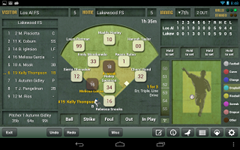
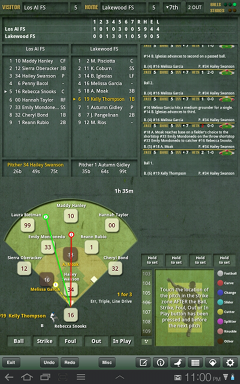
The scoring screen is where you will spend most of your time. The other screens help you get ready to score a game, but the scoring screen is where the real action takes place. While the management screens are very similar between all devices, there will be some variances in the scoring screens depending on device type, device orientation, platform, size, etc.
iPhone | iPad | Android |
|
|
|
While the screens may look different from device to device, all of the same core scoring functionality is available on all devices. Tablets provide the most screen space and allow more to be done from the main scoring screen. Phone size devices provide the same functionality, but sometimes it requires a couple more taps, or revealing additional screens to perform some of the same actions.
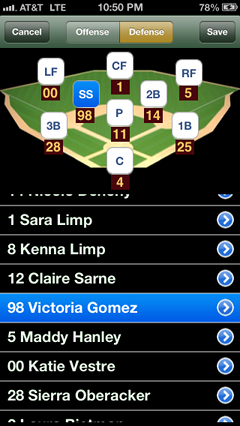
When you first click “Play” from the Game Info screen for a new game, you will be taken to the scoring screen. The first thing you will need to do for a new game is verify the starting lineups for each team.
iPhone | iPad | Android |
|
|
|
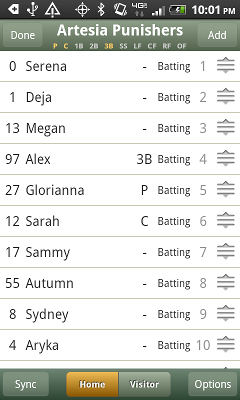
|
|
From the pre-game Lineup screen, here are the options available.
Sync - This is used for the Major League Roster add on. As soon as the official lineups are set for the teams on game day, the Sync button can be used to automatically set the starting lineup for a Major League team.
Done - Once you have set the lineups for both teams, tapping Done will take you to the main scoring screen.
Add Player - Add Player can be used to add missing players to the Lineup for a team.
|
Positions Set - Android devices have a list of the positions across the top and as starters are assigned to each position, it gets highlighted. This allows you to quickly see any positions that have not yet been set.
Adjusting Batting Order - You can change the batting order of players by placing your finger on the “three bar icon” on the far right of each player row, and the row will “lift”. You can then drag it up/down the list to set your batting order.
Setting Fielding Positions - On iOS devices, you can tap on the player row where the fielding position is displayed to set the fielding positions right from the list screen. On Android devices (or if you prefer on iOS devices), you can tap a player name to bring up the details of the player, and set position from there.
Setting Jersey Number - On iOS devices, you can tap the jersey number on the list for any player and change the number right form the list. On Android (or if you prefer on iOS), you can tap the player name to bring up the details of the player and edit the jersey number from there.
Setting Batting Status - You can set the Batting status of each player to No (player is not batting in the game by default), Yes (the player IS batting in the game), DP (player is acting as Designated Player for the game), or Flex (Player is acting as the Flex for the game). When a Player is set to Batting = No, they are available as an offensive sub if/when needed. When a player is set to Batting = Yes, it means they are in the starting batting order.
|
Home / Visitor - This selector allows you to switch between the home and visitor lineup so you can set them accordingly.
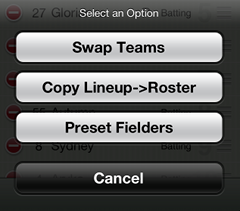
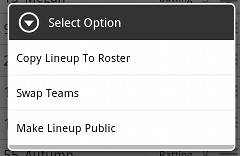
Options - Pressing Options from the starting lineup screen will give you a few options:
iOS | Android |
|
|
Print Lineup Card - On iOS devices, if you have an “Air Print” compatible printer, you can tap the icon that allows you to Air Print the lineup card right from this screen.
Preset fielders allow a coach to plan the defensive lineup for a team prior to game time. In youth / rec leagues, it is very common for a coach to try and distribute playing time evenly amongst the players on the team varying positions throughout the game, even inning by inning.
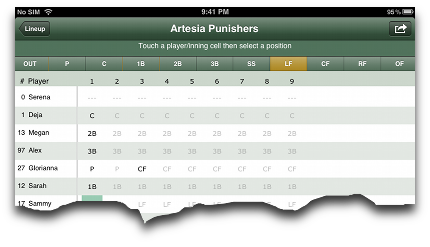
The preset roster entry screen allows you to quickly configure the positions for the entire game. You just tap a “cell” in the grid representing the Player and Inning, then tap the position the player should play at that point in the game. The preset fielders screen will ensure only one player is in each position for any given inning, and will “fill out” the grid for the rest of the game until someone subs into that position. This makes it very quick to enter and rearrange your fielding positions.
If you have an Air Print compatible printer, you can tap the air print option in the upper right corner to print out the Preset Fielders.
Once you have set preset fielders for a game, they will automatically be subbed in at the right point during the game. If things don’t go according to plan during the game (injury, changing your mind, etc), you can always still use the standard substitutions to override the automatic substitutions that preset fielders put in place.
|
Once you have set the starting lineups for the game, you are ready to begin scoring. Tap the Play button on the main scoring screen to actually being scoring.

Once you tap the Play! button, you are ready to begin scoring. The main functions of scoring are handled by the buttons along the bottom of the device:
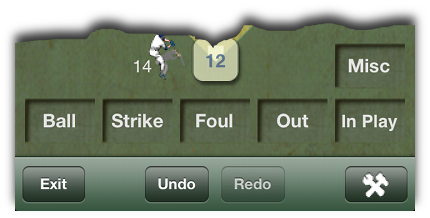
Ball - Tap this button any time a pitcher throws a Ball to a batter. Place your finger on the Ball button, and slide up to enter an Intentional Ball. When you have tapped the 4th ball for a batter, they will automatically register a walk. (EXCEPTION: If you have changed the # of balls for a walk in settings, it will be when this number is reached. If you have selected Coach Pitch on Walk, then the coach will pitch until the end of the at bat.)
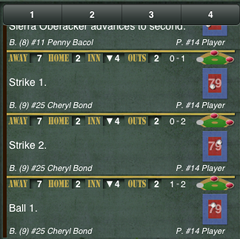
Strike - Tap this button any time a pitcher throws a Strike to a batter. Place your finger on the Strike button, and slide up to enter a Swinging Strike. When the 3rd Strike has been entered (or however many you have set for a strikeout), the batter will automatically get a strikeout. The strikeout dialog will then appear giving you a few choices for how the strikeout occurred:
Foul - Tap this button any time a batter fouls off a pitch. On iOS devices, if you slide up across this button it will give you the option to enter foul ball location for hit charting purposes.
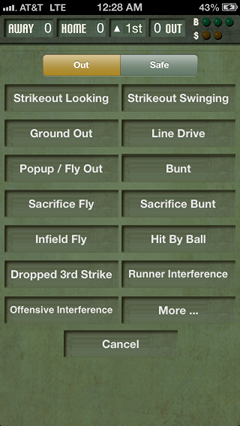
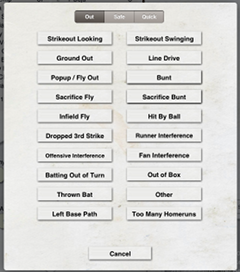
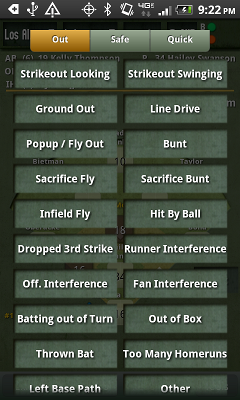
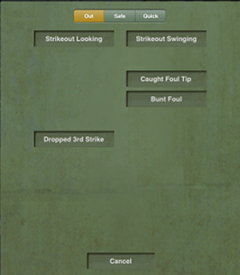
Out - Any time the batter does something that causes him/her to make an Out, you will tap the Out button. iScore will then present you with a set of choices for all ways a Player can make an Out.
iPhone | iPad | Android |
|
|
|
While each device’s Out dialog looks slightly different, the same choices are available on all of them. For the future scoring action popup screens, this guide will only show one representative device. Just know that the same choices are available on all the devices even if they are formatted a bit different.
When entering an out, you will be prompted for additional information depending on the type of out that was made. Just follow the on-screen prompts to complete any scoring entry.
|
For any out where the ball is put in play (as opposed to a strikeout for example), if you have the “Record Hit Locations” option set to Yes (which is the default), you will first be asked to enter the hit location:
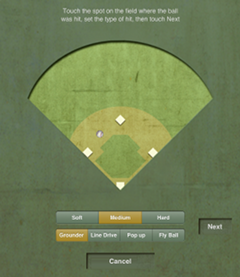
You can tap the location, or you can place your finger on the screen and drag around for more precise placement of hit location. You can enter the strength of the hit ball and the flight of the hit ball as well. Then tap the Next button.
You will then be asked to touch each position that handled the ball. For a typical ground out to shortstop, you would tap the SS and the 1B button. If there is a play that is only handled by a single player (fly out to Right Field for example), you would just tap the one player that was involved.
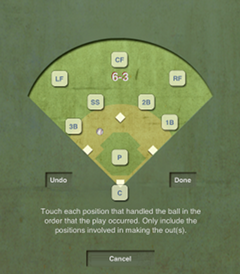
After selecting the players involved, tap Done. If there were no runners on base prior to the play, you are now done entering an out.
If there were runners on base, you will now be prompted for what happened to the runners on base with a dialog similar to this:
iScore will ask about each runner on base starting with the lead runner. This allows iScore to capture the complete information for the play. For example, on a ground out, maybe the Runner on FIrst just advances to second. In that case, you would enter Safe, Second, Advanced by Batter.
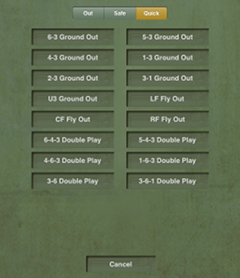
Quick Outs - Placing your finger on the Out button and sliding it up will bring up a quick out dialog. This can often save you a few extra taps as it can automatically do a few selections for you. This is especially true with a runner on first base to enter a double play:
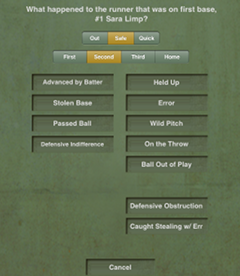
In Play - Any time a batter reaches first base safely, you will use the In Play button. This is true even for things like Hit by Pitch, or Catcher Obstruction.
Pressing in play will bring up the In Play dialog:
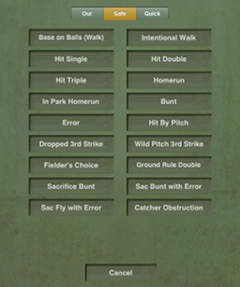
Tap how the runner made it to base safely. In most cases, iScore will prompt you through the same screens the Out dialog prompted you through (Enter hit location, What happened to each of the runners).
In some cases you will be prompted slightly differently (Fielders Choice and Error for example).
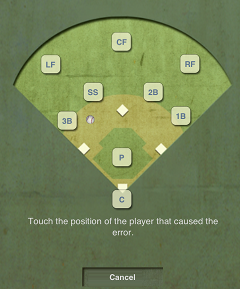
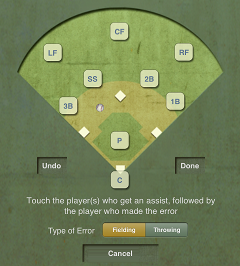
If you say the runner was safe because of an Error, you will be asked to tap which player made the error. If you have Advanced Scoring enabled, you will also be given the option of whether the error was a Fielding or Throwing error, and you can still give an assist to a fielder on plays that warrant it. An example of the assist would be SS fielding the ball and making a clean throw to first, but 1B drops the ball. In this case, SS would still get an assist even though an out was not made. To enter this, on the Error screen you would tap SS then 1B when asked about who made the error. SS would get the assist, 1B would get the error.
Basic Mode | Advanced Mode |
|
|
|
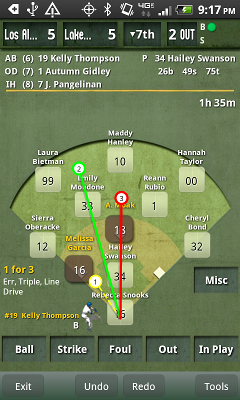
Sometimes while scoring, a runner will do something outside of the batter hitting the ball. In these cases, you will tap on the runner to bring up the runner dialog. If there are multiple runners on base, you should tap the lead runner, and iScore will prompt for all runners on preceding bases as needed. You will use this to enter things like Stolen Base, runner advancing on Passed Ball or Wild Pitch, Pickoffs or Pickoff Attempts, etc.
If you place your finger on the runner and slide your finger up, you will also bring up the “Quick Play” for Runners menu:
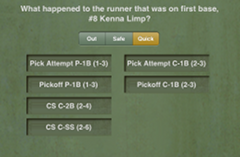
Using the Quick Play option can save several taps.
One special case scenario when advancing runners is when an error occurs on a play. As long as you enter the same “touches” for each step of entering a play, iScore will correctly assign just a single error to the fielder. For example, a grounder to SS, and he bobbles it or mis-throws to first with runners on first and second. If the runners would have advanced regardless of whether the shortstop had made the play, you might enter them as Advanced by Batter (runners can still be advanced by batter when outs are made).
If however the lead runners only advanced because the error was made, you could enter Error as the reason for advancement for the runners. Be sure to select “SS” as the person that made the error for each play, and only a single error will be assigned to the SS. If you have Advanced scorekeeping mode turned on, you will also be asked whether the runner still would have been out if the error had not occurred:

The reason for asking this is so that iScore can make a better determination of Earned vs Unearned runs. If the runner would have been Out had the error not occurred, then that runner will not be eligible to be an Earned run. If the runner would have still been safe had the error not occurred (e.g. they would have still been safe at 2nd, but only advanced to 3rd because an error occurred somewhere else on the field), then the runner is still eligible to be an earned run if they score.
There are several options available under the Misc option. These are things that can occur in a game that don’t fit in the “In Play” or “Out” menus. Tap the Misc button (or the Menu button on Android devices) to reveal these options.
Balk - If the pitcher balks during the course of play, tap the balk button. iScore will record the balk and advance baserunners if they are present.
Illegal Pitch - If a pitcher performs an illegal pitch, tap this button and you will then be asked if runners should advance bases or not.
The difference between Balk and Illegal pitch is that with a balk a Ball is not given to the batter. With an Illegal Pitch, a ball is given to the batter.
Assign Error - If a batter hits a foul ball that is dropped by a player, you can use this option to assign an error to that fielder. This will affect Earned Run calculations as appropraite.
End Inning - If a team’s at bat should be ended prior to 3 outs being made, you can use End Inning. It actually ends the half inning. This is common when there are a max number of runs that can be scored or in leagues where all players in a lineup bat, then the other team comes to the plate (youth t-ball for example).
Tie Breaker - If a game ends in a tie, some leagues use a standard Tie Breaker rule. Under this rule, the last person out will generally start on second base. iScore gives you the flexibility to start with any runner on any base if local rules dictate. Many people mistakenly think that a tie breaker starts with 1 out. In most cases this is not true. Some local rules may call for it in which case you can use the Misc -> End Inning option when the second out is made.
End Game - If a game ends early, you can use the End Game button to let iScore know the game will not be played out to your scheduled number of innings. This can happen in Time Constrained games or in Mercy Rule scenarios. If your league should “roll back” to the end of the previous inning, you can use Undo back to that point in the game. We get questions occasionally when rolling back about maintaining the stats for the plays that occurred. You can’t have it both ways... either you roll back (and the stats don’t count), or you leave the plays in place and don’t roll back. For example, if it was a zero-zero tie, but in the plays before the game ends a team scores 5 runs, if you roll back, those 5 runs go away. That would mean the RBIs etc would go away too. You can’t have an RBI for a run that doesn’t count --- things will not balance out.
Rain Delay - This can be used for games that are delayed due to rain. When you select this option, the “game time clock” will pause until the next time you being scoring this game again. If you don’t care about the game time clock (the Umpire is the only one with the “official” game time anyway), then using this button is really not necessary. You can stop and resume scoring a game at any time.
Show Starting Lineup - If you need to make changes to the starting lineup for a team (you had something wrong at the start of the game, or you need to correct a jersey number or player name, or add a player as a sub that you had not entered at the beginning of the game), you can do it here.
|
Email Game Link - If you want to send a link to the iScorecast for the game, you can tap this option. The link sent will be to this specific game only as opposed to being for the listing of all games scored by this device.
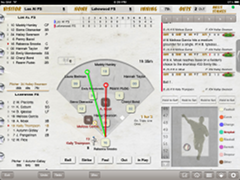
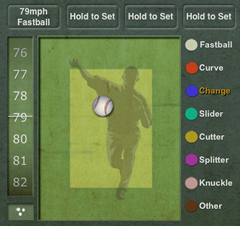
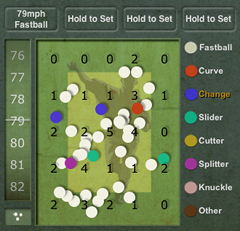
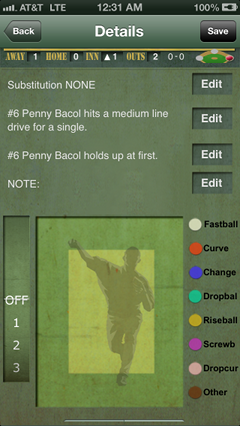
iScore allows you to track pitch details on every pitch of the game - Pitch location, Pitch type, and Pitch speed. This information will be displayed in the pitch by pitch listing and on iScorecasts. The pitch speckle chart can be viewed on the pitch tracking screen, and is also included on the emailed Scorecards. There are also statistics that will track effectiveness by pitch type.
Pitch Tracking Entry | Pitch Speckle Chart |
|
|
On tablet size devices, pitch tracking is available right from the main scoring screen. On phone size devices, you place your finger in the outfield of the scoring screen and “flick” to the left to reveal the pitch tracking. To get back to the main scoring screen, you would “flick” back to the right.
On phone size devices, you can do the basic scoring right from this screen if you would like, and only flick back to the main field view if you need to perform an action on a baserunner.
Depending on what setting you have for “Pitch Location First”, you will either enter the pitch location prior to the outcome of the play (if this setting is Yes), or you will enter the pitch location after you enter all the play details (if this setting is No).
Depending on your setting for “View from Behind”, you will be enter pitches based on a view from behind the Catcher (default), or from behind the Pitcher. You will want to adjust this depending on where you are sitting while keeping score. The effect is the left / right placement of the ball as they would be opposite depending on your view.
Pitch detail entry is completely optional, but can give you greater insight into various aspects of your players if you do track the information. iScore itself provides some basic reporting on this information, but if you get one of the Analytics add ons (EdgeHQ and TruMedia Networks provide very detailed analytics options), then you can get even more detailed information about how players do based on the detailed pitch information.
There are three parts to tracking the complete pitch detail.
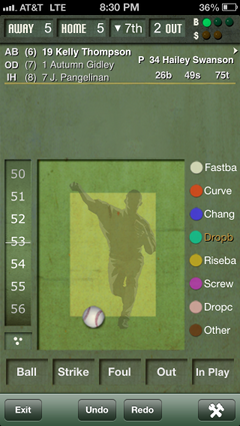
Pitch Location - Just tap in the pitch entry area the location of the pitch. The “inner rectangle” should be considered the approximate strike zone, and the outer rectangle would be outside the strike zone. If a ball bounces in the dirt, you can tap the bottom most area of the outer rectangle.
Pitch Type - Depending on whether you have iScore set for Baseball or Softball, the pitch types will change to match the pitch types generally thrown in that sport. Just tap on the label for the pitch type that is thrown, and it will highlight that pitch type.
Pitch Speed - The numbers in the bar to the left of the pitch area are a “speed wheel”. Flick it up/down to change the speed of a pitch. If your field has a scoreboard with a speed gun, entering these values would just be copying from that display. If you have your own speed gun, just enter whatever reading you get. If you are using an iOS device, there is also a timing mechanism that can be used to approximate the pitch speeds. To use this, be sure your Mound Distance settings has been set on the Options menu (button in bottom right corner of scoring screen). Place your finger in the pitch location area and hold it there. When the pitcher releases the ball, lift your finger. When the catcher catches the ball (or would have caught the ball), tap back down. This will time the pitch and, based on mound distance, will give you an approximate MPH. It will also give a second number in parenthesis. This second number number is the “Major League equivalent” speed. This means based on the amount of time a batter had to react to the pitch, what speed would a major league pitcher have had to thrown for a batter to have the same amount of time to react. At the highest levels of fast pitch softball, the pitchers will often be throwing the equivalent of 100mph+ speeds. The batters have even less time to react than a Major League baseball player would have.
You can decide to track just pitch locations, just locations and types, just locations and speeds, or not track pitching locations at all. It is up to you.
The little “3 ball icon” below the pitch speed wheel toggles the speckle chart on / off for the current pitchers. This lets you see pitch locations of previous pitches during the game, and includes a breakdown in a “grid” as well.
Some devices will allow you to enter “presets”. A preset is a stored pitch type and speed. Since most pitchers will tend to throw the same pitches at approximately the same speed, you can either use a speed gun or time a pitch, and when you feel you have a good reading, hold your finger on the “Hold to Set” buttons and it will create a preset for that speed / pitch type combo. You can then just tap those presets to enter future pitches.
On tablet devices, you will see a play by play listing of all previous pitches right on the scoring screen. This allows you to confirm your data entry as you go look back through the list for detail if needed
On iPads, tapping a pitch in this listing will allow you to make basic edits to the previous pitches as well. On all devices, if you exit out of the scoring screen and go to the Pitch by Pitch listing from the Game Info screen, you can make your edits.
You can tap the Inning Selectors at the top of the pitch by pitch listing to jump directly to the top half of the selected inning.
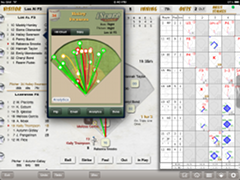
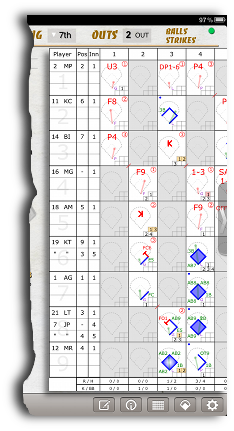
A traditional baseball scorecard is viewable in several different ways in iScore. You can view from the scoring screen, you can view from the Game Info screen, you can view from the Admin Website or Team Website, and you can email a PDF of the scorecard from the Game Info screen as well.
From the main scoring screen, if you tap the Tools button in the bottom right corner of a phone device, there is an option to display a traditional scorecard. On a tablet device, there is an icon in the bottom toolbar that can be tapped directly to display a scorecard.
From the Game Info screen, you can view the Home or Visitor scorecard by tapping the Scorecard option for the team you want to view it for.
When you use the email option from the Game Info screen, you will have an option of including the Scorecard PDF in the email. When you email the scorecard, it is also stored on our server so that it is available to view on the Admin Website and optional Team Websites.
On iPad devices, there is also an option to view a live-updating version of the scorecard right on the scoring screen.
The gray arrow on the far right of the scoring screen can be used to expand/collapse the scorecard by tapping it. You can decide if it should cover the pitch by pitch section, the pitch detail section, or both. Just “flick” the arrow up.down to move the scorecard up or down on the scoring screen.
You can leave this scorecard open while scoring and it will update in real time as you enter plays.
On iOS devices, there is an icon in the left field area that can be used to control details of iScorecasting. If it has a red X through it, that means iScorecast is turned off. If iScorecast is enabled, it will look like a broadcasting tower without the X. It will also show the number of viewers that are currently watching your iScorecast
iScorecast Disabled | iScorecast Enabled |
|
|
Tapping on this iScorecast icon will bring up iScorecast details:
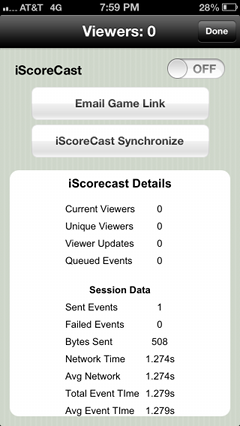
This iScorecast functionality can be turned On/Off right from this screen. It requires internet access at the field for updates to be sent up to the iScorecast server.
Email Game Link - Use this button to email a link directly to this iScorecast to anyone that would like to view the game.
iScoreCast Synchronize - Tap this button to re-send all events up to the iScorecast server for this game. This can be useful if you started scoring the game prior to activating the iScorecast, or if a spotty internet connection has caused events to not make it to the server.
iScorecast Details - This will show you the # of viewers currently watching the game, the total # of unique viewers that have watched this game, the total # of updates that have been sent to viewers (each viewer gets an update about once every 15 seconds), and the # of queued events. If you have a good internet connection, the Queued Events should stay right around 0. If you have a spotty internet connection or no internet connection, events may get queued up and be sent to the server as soon as internet connectivity is restored.
Session Data - This shows very detailed statistics for your iScorecasts. It can be used to help troubleshoot connectivity issues and to see the total amount of data that has been transferred to the iScorecast server.
The bottom of the scoring screen will have various options depending on the type of device and the settings you have enabled on the device.
iPhone |
|
iPad |
|
Android Phone |
|
Android Tablet |
|
All of the devices have the following main toolbar icons:
Exit - Use this to exit out of the scoring screen when you are doing scoring. You will get a confirmation asking if you are sure this is what you want to do.
Undo - You can tap this after entering any play to Undo that pitch. You can tap Undo repeatedly to undo several pitches (and any associated events). You can undo all the way back to the start of the game if you want.
Redo - As long as you remain in the scoring screen, you can use Redo to restore a pitch that was undone with the Undo option. You can only do this if you have not entered a new pitch after using Undo.
Tools - The icon in the bottom right corner (or Tools button on Android Phones) is used to bring up various settings. You can view stats, view the scorecard, or change the game settings (see the Game Settings section for more information on these values).
Tablet devices have additional options available as follows:
| The Misc button will bring up a menu of choices. The Misc button is right on the scoring screen on phone devices. See Misc Options for more information. |
| Enter a note for the game. You can enter a note at any time and it will appear in the iScorecast and Play by Play listing. It will also appear in the Scorecard PDF on iOS devices. From iPhone / iPod Touch devices, “flick” the top line score area to the left twice to reveal a Notes option. From Android Phone devices, Notes are available from the Menu screen on the main scoring screen. |
| Inning Recap - this will show summaries by half inning after a half inning has completed. You can see runs scored, LOB totals, pitch counts, etc. |
| Send Tweet - If you have TwitterCast enabled, this icon will be visible and tapping it will send a tweet with the current status of the game. |
| View Statistics - Tapping this will bring up statistics for the game. You can toggle between Home and Visitor statistics. |
| View Scorecard - You can view a traditional scorecard for the game by tapping this icon. |
On tablet devices, if you tap a player in the lineup display, it will bring up a player card for the player. This allows you to quickly get a player history and see the hit charts for the player. See the Player Card section for more details on what is visible on a player card.
On the 7 inch Android tablets, there was not quite enough room to squeeze everything into the display that is available on the larger 10 inch models. Therefore, iScore has a few tricks to reveal the additional information available.
If you tap the Balls / Strikes label in the upper right corner, the Pitch Detail are will toggle between allowing you to enter pitch details, and a Pitch by Pitch listing. Some people prefer not to enter pitch details, so a pitch by pitch listing may be more helpful.
If you tap the Home / Visitor team labels at the top of the scoring screen, it will toggle the lineup that is displayed between the Home and Visitor teams. This allows you to see the batting lineup and current pitcher details for either team.
Two of the trickier plays to score are a Fielder’s Choice and a Double Play. The double play can be entered easily using Quick Plays as noted earlier in this document, but here are some examples of using the standard scoring screens for those plays.
A Fielder’s Choice is any play where a fielder decides to try and get the lead runner instead of the batter when with ordinary effort it is likely the batter could have been thrown out at first if that play was made instead.
The typical Fielder’s Choice would be something like a runner on 1st base with a Ground ball to the shortstop, and the shortstop makes the Force Out at second base instead of throwing to first. To enter this play, here is the sequence of taps:
Fielder’s Choice - Ground Ball to SS, makes out at Second, Batter safe at First
In Play
Fielder’s Choice
(tap ball location near shortstop), Next
SS - 2B, Done
(asks what happened to the runner that was on 1st base)
Out, Second, Force Out
(if Minimize Questions set to No, asks what happened to the batter, and you will tap Held Up)
Another scenario for a Fielder’s Choice could be an attempt to make an out but no out is made, and everyone is safe. Here is an example of that:
Fielder’s Choice - Runner on 3B, Grounder to SS, attempt to get runner trying to score
In Play
Fielder’s Choice
(tap location near shortstop), Next
(there was no out, so do not tap any fielders, just tap Done)
(asks what happened to runner that was on 3rd base)
Safe, Home, Advanced by Batter
(if Minimize Questions set to No, asks what happened to the batter, and you will tap Held Up)
|
The easiest way to enter a double play is from the Quick Outs menu. Place your finger on the Out button, and slide it up without lifting. This will present you with a list of “quick out” options to choose from including double play options.
Here is an example of entering a double play through the standard scoring process:
Double Play - Runner on 1st, Ground to SS, 6-4-3 Double Play
Out
Ground Out
(tap location near shortstop), Next
SS - 2B - 1B, Done
(asks what happened to runner that was on 1st base)
Out, Second, Double Play
Substitutions are an important part of scoring a game. iScore breaks substitutions into two separate actions to account for rules at all age groups, and to make it easier for a scorekeeper that is observing a game to be able to make the substitutions without having to have “inside information” on the substitutions that are taking place.
Different leagues and age levels have different rules surrounding defensive substitutions. Rather than try and enforce a particular set of rules, iScore allows you to score within your rules whatever they may be. You can make a defensive substitution at any time of a game. You can take a player out of a position, put a player in a position, or move positions at any time. You just score whatever you see happening on the field. It is up to coaches and umpires to keep things “within the rules”.
Performing a defensive substitution in iScore is very easy. When the team that needs the defensive sub is on the field, tap the position that needs the substitute, then select the player that should be in the selected position from the list of players. To enter multiple subs at the same time, or to perform a double-switch, just tap each each defensive position that needs a sub and select the player that should be in that position.
iOS | Android |
|
|
In addition to being able to perform substitutions from this screen, you can make player edits right from this screen as well. This can save you time when facing a new team for the first time and not knowing the players. You can tap the icon in the far right column to bring up player details and edit the Jersey Number, Player Name, or Batting side of plate for the player.
|
As you can see on the screenshot, you can do an Offensive substitution at the same time by tapping the Offense selector and making the sub from there as well. If you happen to know the offensive substitution at the same time a defensive substitution occurs, by all means make both adjustments at the same time. There are many times however that the offensive substitution is not obvious --- double switches, a player coming in just for defensive purposes but never batting, etc. By separating the two, it does not matter to iScore.
Many leagues use an “all players bat” rule, and offensive substitutions never have to be made. In the cases where it is not an “all players bat” rule, you will need to know how to make an offensive substitution.
The first important thing to know is that in order for the Offensive substitution option to be available, you must have at least one player in the starting lineup set to Batting = No. This tells iScore the player is available to bat, but is not in the starting lineup. You should enter all players available to play in the lineup, and just set the ones that are not batting to Batting = No.
To make an offensive substitution, tap the batter icon on the main scoring screen and the Offensive Substitution menu will pop up:
iOS | Android |
|
|
The batting lineup is listed horizontally across the top of the Offensive substitution menu. Tap a lineup spot, then tap the player that should be batting in that spot. If the screen is not wide enough to show all the batters, you can scroll them by flicking the lineup area. That is all it takes to make an offensive substitution.
League Manager is where you go to manage Leagues on your device. If you think of a “League” in iScore as a “Group”, you will start to understand the power of league usage. You can create any number of Leagues on your device, and group your Teams, Games, and Players into these groups. One of the most obvious uses for Leagues is when you start a new Season for a team, you can create a league to represent that season (e.g. “Fall 2012”, “Spring 2013”, etc). More uses for Leagues could be “Preseason”, “Regular Season”, and “Post Season”. Less obvious uses, but possibly where the most power comes in, would be for things like “Turkey Day Tournament” or “Night Games” vs “Day Games” or even “Last 10 Games”. By grouping your games in these ways, you can view the cumulative stats for different sets of games so you can understand player performance in different situations.
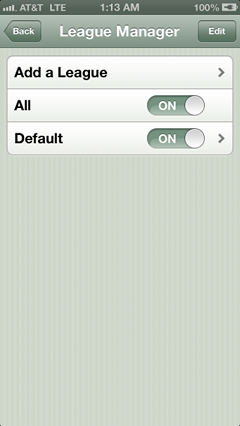
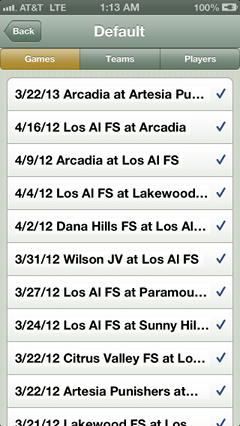
When you go into League Manager, you will see a list of leagues on your device. Initially this will just be the “All” and the “Default” league. The “All” league has special meaning - everything is always in the All league. You can not remove items from the All league. The “Default” league is just a league that is placed on your device to have one league in addition to the All league. You can rename or remove the Default league if you would like.
Add a League - To add a new league, tap this option. You give the league a name, and set whether it is active or not (On/Off). On Android, an Active league has a check next to it, and a league that is not Active does not have a check.
Turning League On / Off - This is where the power comes in. When you turn a league ON, it means you want to see all data that is a member of that league. When a league is OFF, it means you do not want to see data for that league. Keep in mind that data can be in multiple leagues, so if it is in any of the leagues that are ON, then the data will be visible.
Assigning Data to Leagues - The main way to assign data to leagues is as you create the data (Team, Game, Player), there is always a Leagues option in the details for that data. When you tap the Leagues option on that data, you can decide which league(s) that data should be a member of. The more diligent you are about assigning leagues, the more value you will get when running reports. On iOS devices, if you tap the “right arrow” next to the League Name, it will bring up a screen that allows you to assign Games, Teams, and Players to the currently selected league. This can be faster than assigning it to each piece of data in the cases where you add a league at a later time.
One of the easiest ways to manage your leagues is to make sure you have the All league turned on in League Manager while scoring games. Add any game you score to the League(s) you want to see cumulative stats for the game in while creating the games. You also need to make sure your Teams are assigned to all the Leagues you want to report for.
When it is time to run a report, go to League Manager, and turn OFF all the leagues except the one you want to view stats for. Then go to Team Manager, select your team, and view Stats. This will show stats for just your selected leagues.
When you are done running reports, go back to League Manager and turn the All league back on.
|
The Options screen allows you to set various iScore-wide settings for your device.
iPhone | iPad | Android |
|
|
|
iOS devices allow registering right from the device itself. Registering your device allows you to log in to the Admin Website with your email address instead of having to remember your customer ID. The bigger benefit to registering is when you have multiple devices. Using the same email account will link the accounts together, and allow you to easily add MLB subscription Add Ons to your additional devices and even do full iScore Database transfers between your devices.
You can also register online by following the instructions below:
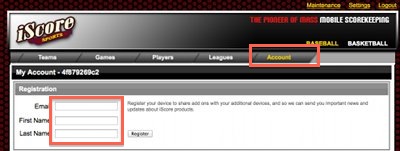
iScore has various add ons that can be optionally purchased to enhance your scoring experience. Examples that will appear on this page are the Major League Roster Add on and the TruMedia Analytics Add On (iPad Only).
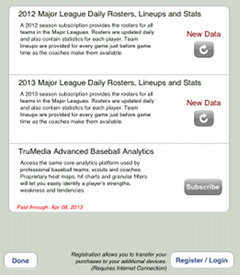
You can manage / renew your add ons from this screen.
WIth the Major League Roster add on, you will come to this screen daily and use the Refresh button to get the updated rosters / stats for each Major League team.
One of the great features of iScore is the ability to share your games live with fans that are not able to make it to the games (parents at work, grandparents out of state, military parents overseas, etc). This functionality is included free with all iScore products. There is no charge for fans to watch games live.
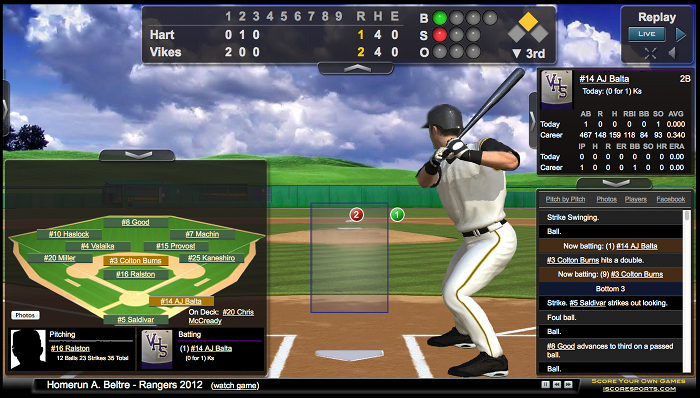
iScorecasts require internet connectivity while at the field to allow live viewing of a game. In order to use iScorecasts, the first thing you need to do is enable them on your devices. Tap on the iScorecast option, and it will show you the information people will need to view games you are scoring.
iPhone | Android |
|
|
People who want to view your iScorecasts from their computer will enter the Viewer URL (http://iscorecast.com) in their browser, then type in your Customer ID. This will allow them to view any games you have scored.
|
|
If you would like to limit the viewing of your games to only people with an additional password to view the game, you can log in to the Admin Website for your device, select the Games tab, select Scorecasts, then click the lock icon next to any iScorecast and you can add a password that users would have to type to watch the game.
iScore TV - iScore TV is a portal that can be used to find games going on live (or very recently scored or upcoming games) easily. Fans would go to http://iscoretv.com, and a list of all currently active games is available. You can type the name of a team to easily find the games, and there is even an option to find games that are being played near you.
After viewing the iScorecast details screen for the first time, you will have the option to turn on iScorecasting. Be sure you set the iScorecast switch that appears to ON so that iScorecast is enabled on your device. As long as iScorecast is ON when you create and score your games, they will automatically be sent up to the iScorecast server for viewing by your team’s fans:
IOS | Android |
|
|
If you score a game while iScorecast is not turned on (or don’t have internet connectivity at the field), you can still send the iScorecast up to the server by using the iScorecast Synchronize option from the Game Info screen (see the Game Info section for more information on using iScorecast Synchronize).
Cumulative Stats - The iScorecasts by default will show cumulative stats for the players in the game. The cumulative stats come from the last time the scoring device did an Export to the server. If you do not want the cumulative stats to show, they can be disabled by logging in to the Admin Website, selecting the Settings option in the upper right corner, and then check the “Disable Cumulative Statistics on iScorecast” option.
The iScorecasts will show a Baseball or Softball field based on the settings you used for your game. It will also show a male image for batters baseball and a female image for batters for softball. (We realize both males and females can play either sport, but the majority of the time, this is going to be correct.)
TwitterCast is the ability to send game updates out to your Twitter account as a game is being scored. When TwitterCast is enabled for your device, and you have internet connectivity at the field, tweets will automatically be sent at the end of each half inning. You can optionally send additional tweets during the game by tapping the Tweet icon in the scoring screen.
iOS | Android |
|
|
To enabled TwitterCast, first select the TwitterCast option from the Options screen. Then enter your Twitter credentials on the Twittercast screen and Authorize iScore to send tweets to your account. (NOTE: iScore does NOT keep your user name and password on the device. It gets a “token” from Twitter that is used to send the tweets on your behalf.)
After validating your Twitter credentials, go back to the Options screen, and be sure to set Twittercast to ON. Just entering your credentials does not enable Twittercast. You must tell iScore you want it to be on while scoring. This allows you to toggle it on/off for different games without having to re-enter your credentials each time.
Each iScore device has a unique Customer ID associated with it. The Admin Website is the “online extension” of the scorekeeper’s device. You can use the Admin Website to enter team rosters online, view a few reports (play by play listing for games, Box Scores, Hitting Charts for teams), and various other “account level” tasks. The Admin Website is not intended to be shared with others as anyone accessing the site will also have access to change your data. If you want an online presence to share data with others, you can use the included iScorecast capabilities, you can email yourself stats and post them to any site you like, or you can purchase an optional iScore Team Website that gets automatically updated any time you Export data from your device.
iOS | Android |
|
|
The Admin Website screen in iScore shows you the URL to use to log in to the Admin Website (http://my.iscorecentral.com) as well as your customer ID and password. You can come to this screen any time to change your Administrator password.
You can find various items on using the Admin Website to perform different tasks in the FAQ section of our website at:
http://iscoresports.com/baseball/support.php
Data Sharing allows you to copy Teams and Games between devices. This is different than the “Discover” functionality as it will transfer completely scored games between devices. It will also allow you to “map” players between devices.
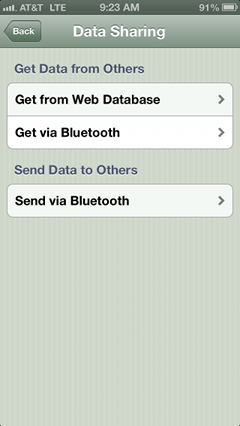
On iOS devices, you can use Bluetooth to transfer data between devices. You would set one device up to “Get via Bluetooth” and one to “Send via Bluetooth”.
On Android and iOS devices, you can use the “Get from Web Database” option to transfer teams / games between devices. Using this option requires that the person you are trying to retrieve data from has already done an Options -> Export with the data. You will select “Get from Web Database”, and enter the user’s Customer ID and Password. It will then show any Teams and Games on the remote device that you don’t currently have in your account.
The password you use can be the Admin Password of a user, or it can be the Data Share password that can be set up on the Admin Website by going to the Settings option on that site.
When importing data using Data Sharing, you can “map” players and teams to equivalents that already exist on your device. For example, if you have created a Player record for “John Smith” on your device, and you are importing from another device that also created a Player record for the same “John Smith”, you can map that player to your existing player so that the stats apply to that player on your device. For more details on Data Sharing, see this article in our FAQ:
http://iscoresports.com/baseball/kb/faq_data_share/data_share.php
|
On iOS devices, there is an Option called Synchronization. This is a background task that will run on your device, and send “archives” of your games up to the iScore servers. This process will automatically put the scorecards for your games on the server, and will create a backup copy of your data. (See Data Sharing and the “sync:” option for more information on the backup.)
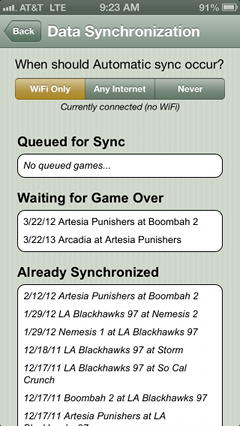
The various options on this screen are as follows.
WiFi Only - When this option is selected, it means synchronization will only occur in the background on your device when you have a WiFi connection. You might choose this option if you have a very limited data plan. The “sync file” for a single game is somewhere in the 100Kb - 150Kb range, so that much data would be used each time a game is synched up to the server. A game is initially synched when the game is complete. If you make any edits to the game that cause stats to change, the game will be synched again.
Any Internet - With this option, iScore will send the sync file up to the server any time you have an internet connection regardless of the type.
Never - This option tells iScore not to send the sync files up to the iScore servers at all.
Queued for Sync - Games listed in this group are completed games or updated games that are waiting to be sent up to the iScore Server.
Waiting for Game Over - Any game that is not completely scored will be in this list.
Already Synchronized - Games in this list have already been sent up to the iScore server, so you know you have a backup and can use the Data Share option if ever needed to retrieve the game.
On some tablet devices, the Light / Dark skin can be set from the Options menu. Other tablets will do it from the Options screen opened from the main scoring screen.
Light - This provides a high contrast background for the main scoring screen, and helps when scoring games in bright sunlight.
Dark - This is not as high contrast and fits more with the style of the iScore product.
On Android Tablet devices, there is an option to select between Small and Large screen mode. Small mode is intended for phone devices, and Large mode is what you would typically use for larger tablet devices.
This option is available on Android devices because on Android, there is a lot of variation from device to device, and the line is being blurred between what a “tablet” device is and what a “phone size” device is. Android tablets have many different sizes, and even two tablets that are the same size may have different resolutions, or in extreme cases, they have the same physical size, the same pixel resolution, but the device reports itself differently.
All of these variations have led us to have to create three different sized screens for “scoring mode” of a game. The Phone mode (Small) should work on any Android device. When you select Large mode, iScore will display either a mid-size scoring display (typically 7” tablets like the original Kindle Fire and the Google Nexus 7) or a full-size scoring display (the large 10” displays like Samsung and Motorola Xoom).
If your device does not look quite right on the scoring screen, try changing to the other mode and see if it works better. It is not possible to support every resolution available as new devices come out every day it seems, but we have done our best to support the most popular brands.
Exporting your data to the iScore servers is possibly one of the most important things you can do after you make changes on your device or score a game. By exporting to the server, your full iScore database is backed up. Any add ons that need access to the data (Admin Web Site, Team Websites, Player Spotlight sites, Analytics Add Ons, Discovery data partners, etc) will not have access to your stats until you do an Export after scoring a game.
The export will also protect you against lost, stolen, or damaged devices. You will always be able to recover your data from the iScore servers if it has been exported.
While Export should be used often, Import is used very little. Importing data will copy the last exported data from the iScore server back to your device, and overwrite the iScore data that is currently on your device. When you press it, you will get a warning asking you to confirm this is what you want to do. Be sure it is, as an import cannot be reversed.
There are only a few times you might use the Import option:
1. If you are going to use the Admin Website to update data online. In this case, you would do an Export from iScore, then log in to the Admin Website and update your data, then do an Import to retrieve the changes you just made
2. If you remove iScore from your device and then reinstall it for any reason (full system reinstall). You could then use Import to retrieve data back to your device.
3. If you use the full database transfer option when you get a new device and want to copy the data from an old device to a new device. See this link for more information on doing that: http://iscoresports.com/baseball/kb/faq_general/transferalldata.php
4. If you are working with iScore customer support to recover data because you have a new device or if customer support is helping you fix an issue --- in that case, customer support would tell you when you need to do an Import to your device.
Other than the above scenarios, there is not much reason to use Import on a device.
iScore Baseball Scorekeeper - Reference Guide